Back to the Water with Your Camera
The ever-increasing daylight, songbirds singing, flowers blooming and, of course, warmer weather all signal the return to the water for many citizens of Chesapeake Country. It is also the perfect time to take that camera you received for the holidays (or the one that’s been collecting dust in your closet for far too long) and create photographs of our regions waterscapes.
From the impressionist painters of France to today’s surfing magazines, waterscape imagery makes for powerful pictures that are simultaneously awe-inspiring and calming to the human mind. So whether it’s your cell phone, compact camera or DSLR with various lenses, these tools can be used to create wonderful images. Luckily for us, the Chesapeake watershed has vast miles of tributaries, as well as the Bay itself, for your next masterpiece.
Here are a few tips to help you with yours.
1. Calm water makes for amazing reflections
When the waters are calm and still, they become the sky’s mirror. Anything above the horizon will be reflected in the waters below. Trees and boats make excellent subjects. If it is cloudy, make clouds your subject, as the water will surely create wonderful reflections no matter what time of day. If it’s not cloudy, set up a tripod after darkness falls and photograph the stars and their reflections.
Pro tip: As with any type of photography, it’s critical to understand your subject. Wildlife, sports and landscapes all require some knowledge of the subject to capture your best photographs. For land and waterscapes, use a weather mobile app and look for calm (and cloudy) days as well as the times of sunrise and sunset so you know when you need to be on location.
2. Use leading lines to help the viewer follow the water
Leading lines create depth and let your viewer take a visual journey. They are the key to evocative waterscape images. In the images of the waterfall, your eye begins at the stream below but is led upward along the curvature of rock and water to the top of the waterfall. Soft river edges, rocks and driftwood all make excellent foreground elements to create leading lines. Use your camera to arrange them in a way to help lead the viewer through a waterscape. With so many rivers, creeks and streams flowing into the Bay, the possibilities are endless. If you wish to experiment using leading lines before you head out to the water, try using the roads in your neighborhood, which make excellent practice.
Pro tip: The silky effect on this waterfall was created using a slow shutter speed on a camera mounted on a tripod. If the camera moves during a slow shutter-speed exposure, everything in the frame will be blurry. A tripod (or if you’re still enough, a stable tree or rock) is imperative to get a sharp image.
3. Storms create awesome situations and amazing light.

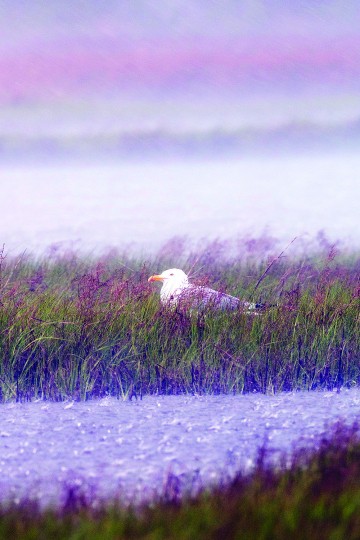
Storms are fun to photograph. They also help to convey drama, as in this photograph of a herring gull. While it is merely taking (barely) shelter from the storm, the motion of the grass, the water droplets and the ominous gray color tell the story. But it could be anything you wish to focus on (pun intended): a harbor, pier, crashing waves. What is the story you want to tell? Let the stormy weather make your waterscape powerful. Also, cover your gear with something water-resistant. Many cameras (and phones!) do not take kindly to water, and the longer you are out there, the more likely something will malfunction.
Pro tip: The light just before a storm begins and after one ends is usually magical. Missed the beginning? Wait it out, preferably in your vehicle or tent. That patience will pay off with amazing light in the waterscape.
4. Use a Neutral Density (ND) filter to balance high contrast scenes

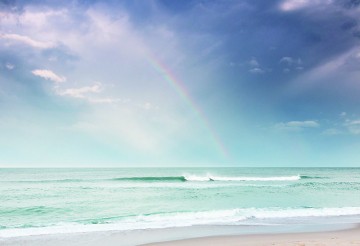
The dynamic range we can interpret in our eye is nothing short of amazing and much better than a camera can see. In this scene of a rainbow, I could not expose the sand in the foreground without blowing out the highlights in the sky, which would make me lose the rainbow. If I exposed for the rainbow, the sand would appear much too dark and unnatural. To compensate for this, an ND filter in front of my camera’s lens allowed me to expose for the sand while maintaining the dynamic range of the sky and rainbow, creating a photograph of what my eyes actually saw.
Pro tip: These filters can be expensive so look for used ones (that aren’t all scratched up). Some cameras have built in ND filters.
