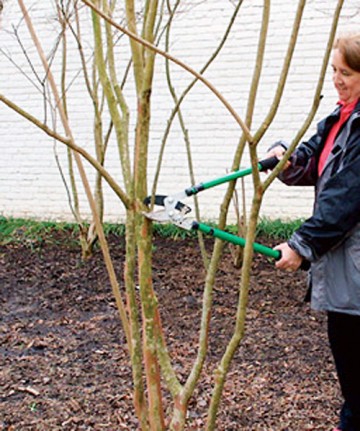
Pruning is the most effective method we have to improve fruit quality. A yearly early spring trim minimizes flowers, forcing better quality fruit.
Trees should be well established before you begin pruning and training. Begin a year after transplanting.
A well-trained fruit tree looks like a Christmas tree, with two to three well-developed bottom branches 30 to 36 inches above the ground.
The angle where the branches connect with the stem should be as near to 90 degrees as possible. Avoid narrow crotch angles. A strong central stem is pruned to grow to a height of six to eight feet, depending on your fruit-picking abilities.
To prune peaches and nectarines, first remove all branches growing above and below each main branch. Then remove all branches less than 12 inches long. Finally, prune all branches back to 18 inches.
For apricots, remove all thin long whips. Allow most spurs to remain on the main stems.
Prune apple trees into a pyramid shape, keeping the crotches of the scaffold branches as close to right angles as possible to allow light penetration into the middle of the tree. Next remove those upper branches shading the lower branches. Why? Apple quality is dependent on direct sunlight striking the apples sometime during the day. Spacing the branches properly also allows maximum air circulation to minimize diseases.
Cherries are pruned primarily to thin the canopy to maximize airflow through and allow for better spray coverage. You’ll need to spray to prevent brown rot, a major problem in growing cherry trees in Maryland.
Yearly pruning for properly trained fruit trees requires only removing all branches growing on the underside and topside of the bottom branches. Leave the side branches, because they’re the ones that will produce fruiting wood.
Berries
Blueberry plants also need severe early spring pruning to produce the nickel-size fruit that are easiest to harvest. Remove all the small twiggy growth and allow only the stout yellow, yellow-green or reddish stems to remain. Train those new branches to belly height and higher to make it easier to harvest quality fruit.
When pruning blackberries, remove the oldest canes down at the soil line and prune back the side shoots to two or three nodes from which the new stems will grow. I drive a fence post near each blackberry plant and loosely tie the main canes around each fence. To train the plants, I also use three strands of trellis wire on each side of the beds.
Most of the new raspberry varieties are primary cane, so you will need to prune away all of the canes each spring. The new canes will grow from the roots and produce fruit. If you are still growing some of the older varieties of raspberry, remove all of the canes that produced fruit last year and space the remaining canes six to eight inches apart by first removing the weak and small canes.
Azaleas, Rhododendrons and Mountain Laurel
Azaleas, rhododendrons and mountain laurel can be cut down as far as the ground in the spring and come back like gangbusters in July.
Prune your plants 12 to 18 inches below the height you desire, and you allow space for training the new growth.
If you can tolerate not having azalea flowers for a year, the earlier you prune back, the earlier the plant will generate new growth. Do severe pruning before April flowering. Then avoid fertilizing for at least one year.
If you delay severe pruning until after flowering, you may have to wait for new growth until late-May to mid-June.
Prune azaleas down to stems that are almost an inch in diameter and they will generate sprouts up and down that stem within three to four weeks. The stems of azalea plants are loaded with latent buds, and the stems are also capable of generating adventitious buds. Latent buds are vegetative buds that were produced when that stem had leaves attached. Adventitious buds are vegetative buds that are produced at or near the cut surface made at the time of pruning.
When a plant is severely pruned back, its large underground root system is well prepared to supply water and nutrients to all of the original branches you have removed. By delaying fertilizing until the second year of growth, the root system has time to adjust to a lesser amount of top growth. Fertilizing a severely pruned plant can often result in fertilizer burn to the roots.
Roses
Prune yearly to keep your plants strong and healthy.
Spring-flowering roses should only be pruned after they have flowered. Summer-flowering roses should be pruned in late March.
Hybrid tea and floribunda roses that have been in the ground for five years or less should be pruned to within 12 inches of the graft union. As these roses grow older, prune the stems less severely. The stems of older roses are generally pruned to within 18 to 24 inches of the graft union. However, all side branches, or suckers, less than a pencil-width in diameter should be removed. Prune all remaining branches, leaving at least two buds on each branch.
The cut end of all pruned stems that are pencil-width in diameter or larger should be treated with paint, nail polish or carpenters glue to prevent cane borers from entering. Even a thumbtack stuck into the cut end of the stem will prevent cane borers from becoming established.
Remove all canes infested with cane borers. They make perfectly round holes; their progress can be followed by pruning until you uncover solid wood. If the cane borer has entered the graft union, which is that knob that separates the stems from the roots, it is often too late to prevent the death of the entire plant.
Mounding roses and old-fashioned roses are grown on their own roots, and thus can be pruned to the ground without loss of variety. Mounding roses are becoming very popular because they are generally disease- and insect-free and flower all summer long. I even prune mine with the lawn mower.
Hydrangeas
Four species of hydrangeas grow in Chesapeake Country.
The most common, Hydrangea macrophylla, or house hydrangea, produce red, pink or blue flowers. House hydrangeas are pruned in early April by first removing, as close to the ground as possible, canes that produced flowers last year. Prune all stems smaller than a pencil in diameter, cutting close to the ground. These thin weak stems will generally not produce flowers.
Next, cut back each remaining stem down to a strong vegetative bud. These buds will produce strong stems and large flowers.
If you have a house hydrangea that never or seldom flowers, it most likely is a greenhouse forcing cultivar that is not cold-hardy. Get rid of it.
The peegee hydrangea, which produces large white clusters of flowers, is generally grown as a small tree three to six feet tall. Prune this species in March or April around the main trunk. In time, it will develop a large head of branches.
The Hills of Snow hydrangea, Hydrangea arborescens Grandiflora, produces great mounds of white flowers growing on stems from a mound on the ground. Electric hedge clippers are the best tool to prune this species. Cut the stems as close to the crown as possible before the new growth starts in the spring. After the new growth has started, selectively hand prune the smallest and weakest buds and try to space the remaining buds three to four inches apart. This will result in the plants producing the largest and fullest flower heads. In late fall, the flower heads are great for making dried floral arrangements.
The oak-leaved hydrangea, Hydrangea quercifolia, is probably the easiest hydrangea to care for. You simply leave it alone unless an unwanted bothersome branch develops. Choose oak-leaved hydrangea in blue, white and light pink or the cultivar Snow Queen, which produces large, white, cone-shaped flowers and attractive scarlet-colored foliage in the fall.
Crape Myrtle
For plentiful flowers and attractive stems, crape myrtle demands good pruning. April is the time.
This year’s flowers will be produced only on new stems shooting off existing branches. The largest clusters of flowers will grow on the most vigorous stems. This means that if you don’t prune your plants severely enough now, your crape myrtle will produce an abundance of small clusters of small flowers with many of the clusters hidden from view.
Proper pruning begins at the base. You do not want too many stems growing from the base. To maximize the flowering while enhancing the visibility of the stems, select three, five or seven well-spaced vigorous stems and mark them with ribbons or tape to make certain that they are not removed.
Using a pruning saw, remove all other stems as close to the ground as possible. Avoid leaving stumps, because they will produce an abundance of sprouts that will require frequent removal all summer long.
Also remove all branches and stems that cross and rub on the desired stems and branches.
Next remove all side branches from each stem to a height of four to five feet. Now that you have thinned the base, you are ready to do some serious top pruning.
Now, before the sap flows, you can wipe away all small twiggy stems with your hands, as long as you wear leather gloves. But you’ll need pruners to cut out crossing branches and low-angled branches that interfere with mowing the lawn or gardening.
Next cut back all stems that produced flowers last year and prune out all stems that are smaller than a pencil in diameter.
Normally a single pruning each year keeps crape myrtle healthy. If yours does not produce strong healthy stems and large flowers after having been pruned as described, it may need to be fertilized.
Forsythia
Mid-April, when the last petals of forsythia have fallen, is time to prune. Forsythia’s beauty is spoiled when plants are sheared or left unpruned. When either sheared repeatedly or left unpruned, forsythia plants produce fewer and fewer flowers each year and eventually die out. A properly pruned forsythia should appear like a yellow fountain of flowers born on slender brownish-yellow stems.
The proper pruning of forsythia requires that you get down on your knees and remove all old branches that have gray bark. If you have not pruned your forsythia properly, this could means cutting all of the branches as close to the ground as possible. If you prune now, new vigorous stems will emerge from the roots within a few weeks. Allow these stems to grow without further pruning all summer long. If the plants are in good condition, the new stems will grow to a height of five to six feet by mid July, and their bark will be brownish-yellow.
If your forsythia are relatively young, you need only remove the old gray-barked stems near the ground and allow only the lighter brownish-yellow colored stems to remain. Prune all stems smaller than a pencil-width in diameter, and remove all stems bending sharply toward the ground. You do not want these stems to touch the ground, because they will take root and produce new plants, which can result in overcrowding. When you are done pruning, all that should remain are upright single stems with brownish-yellow bark.
By properly pruning your forsythia now, you will be guaranteeing a profusion of flowers on your plants next spring.
Pines
If you desire a dense pine-tree hedge, follow the training method used by nurserymen and Christmas-tree growers to shape evergreens to grow dense. Mid-June is the time.
You must prune within five weeks after the needles appear fully mature, meaning that they have achieved their normal dark-green color. Timing is critical, because pine trees normally only produce one flush of growth each year. If pruning is too late, there will not be sufficient time for new buds to form.
Depending on the species, pine trees produce their needles in clusters of two, three or five, called fascicles. If left unpruned, pine trees will normally only produce a center bud and five to eight side buds at the end of the new growth. By pruning at this time, you force the pine trees to initiate buds in the remaining clusters of needles, forcing more of the needle clusters to form buds.
As soon as the needles on this year’s new growth have achieved normal length, prune back the new growth. If the trees are young, you may want to cut only the new growth in half. If the hedge of trees is approaching the desired size, you may wish to prune back two-thirds to three-fourths of the new growth.
Take care to allow five or six sets of needles to remain on each new stem. Vegetative buds will form in the center of nearly each cluster of needles.
Fir trees and spruce trees can be pruned almost any time of year, but for pine trees, timing is critical.
CARING FOR YOUR LAWN
Choose the Right Grass
Warm-season grasses, including Zoysia and Bermuda grass, should be banned from Chesapeake lawns. They cause nothing but problems.
Lawns planted with these grasses have to be fertilized monthly May through August with high-nitrogen fertilizers, and they must be sprayed yearly with restricted-use pesticides to control billbugs and other insects. They must be mowed close to the ground, so they often become infested with weeds, which requires the frequent use of weed killers. The clippings must be collected and the lawn dethatched.
Warm-season grasses are green during the summer months and yellowish-brown in fall and winter. Some homeowners go so far as to spray them with Greenzite in late fall to make them more attractive.
For all these reasons, avoid such lawns.
Lime Your Lawn, and Skip the Fertilizer
Bay soil is better suited for growing cranberries and blueberries than for grass. If you want a lush weed-free lawn next year, late April and early May is when to take action.
If you haven’t had your soil tested in the past five years, it is likely that you will have to lime your soil. Soil in the Bay area tends to be very acidic. When you apply lawn fertilizers on acid soils, the chances are great that much of the nutrients from the fertilizers will either be washed into the Bay or into the groundwater. If you want your lawn to be dark green and dense, this is the time to apply limestone — not fertilizer.
Lawn grasses grow best on soils that are only moderately acid. It is not uncommon to find soils in the Bay area having a pH of 4.2 to 4.5. Since a pH of 7 is neutral, this means that such soils are very acid and would be ideal for growing cranberries and blueberries — if we had the proper climatic conditions.
By applying limestone now, you’ll neutralize your soil, bringing it closer to the ideal soil pH for growing lawns, between 6.0 and 6.5. In this pH range, all of the nutrients essential for good plant growth are available to the roots of the grasses. In turn, fertilizers you may apply in fall — which is the best time to fertilize bluegrass and fescue lawns — will be effectively utilized by the grasses.
Soil testing is the only sure way of determining the amount and kind of limestone to apply. If you don’t want to take the time to have your soil tested, then apply between 50 and 80 pounds of dolomitic limestone per 1,000 square feet. Do not use hydrated or high-calcium limestone, since most of our soils are deficient in magnesium, and dolomitic limestone contains magnesium.
Use Yard Chemicals Sparingly — Or Not at All
If you live near the Bay, you should not be using weed killers. Matter of fact, weed killers for lawns should be outlawed. Not only are they unnecessary and expensive, they contribute to the pollution of the Bay.
Working with herbicides almost continuously since 1958, I have respect for them and their responsible use. The application of weed-and-feed fertilizers is an irresponsible use of both herbicides and fertilizers.
The combination of these materials is bad for several reasons.
The time to apply a pre-emergent herbicide to control crabgrass is within two to three weeks following petal drop of forsythia: no later than early May in the Bay area. Applying weed-and-feed fertilizer earlier than that means that by the time the crabgrass starts to germinate, the pre-emergent herbicide will have become ineffective.
The same is true when applying weed-and-feed fertilizers to control dandelions and other broadleaf weeds.
Applying fertilizer to a bluegrass or fescue lawn late in the spring means that you will be promoting soft, succulent growth that will be susceptible to disease. Then you will have to purchase a fungicide to control the diseases you caused by applying the fertilizer too late in the spring.
If only a few weeds are growing in your lawn, why apply a weed-and-feed fertilizer over the entire lawn? I have yet to see a decent lawn that needs a weed-and-feed fertilizer treatment.
If the lawn is nothing but weeds, it is time to renovate the lawn and start over again in August or September. No amount of weed-and-feed fertilizer can reclaim a neglected lawn.
Cut It Tall And Let It Fall
As you fire up your lawnmower — or oil up the push mower — for the first time this year, consider making your lawn healthier and easier to maintain.
Set your blade height to three-and-a-half to four inches, mow weekly, and allow the cut grass to remain in place.
By allowing the grass blades to remain at least three-and-a-half to four inches tall, you gain two advantages. First, the soil’s surface remains constantly shaded and cool, promoting rapid decomposition. Such fast decomposing returns nitrogen and other nutrients into the ground, improving the soil.
Second, these longer grass blades can photosynthesize more, growing deeper roots that are better able to absorb more water and nutrients. Stronger grass plants deter weeds such as dandelions, crabgrass, goosegrass and chickweed. These weeds cannot spread outward with taller grass.
Letting clippings settle through the blades also makes sense. Grass clippings contain three to four percent nitrogen and, being succulent, are easily decomposed in shaded ground.
By cutting it tall and letting it fall, you’ll reduce your fertilizer bill, use less gasoline in your lawnmower and save the grass’s energy by cutting blades and not stems. A tall lawn will also keep your mower blade sharper longer and you — or someone else — safer from flying objects dislodged by the spinning mower blade.
MULCHING
The Problems with Mulch
The primary purpose for mulch is aesthetics. A covering of mulch adds the final finish to a landscape.
The second contribution of mulch is reducing water lost by evaporation.
The third and least-effective use of mulch is weed control.
Mulch is ineffective for all but the first purpose.
If you are using mulch to control weeds, you are applying too much. Mulch controls weeds by suffocation. If you are suffocating weeds, you are most likely suffocating the roots of shallow-rooted plants.
Every time you apply another layer of mulch, you are suffocating the roots. Each layer makes it more difficult for oxygen to penetrate down into the soil. Layer by layer, carbon dioxide accumulates around the roots, stunting or killing plants.
As mulches decompose, they leave behind a thin layer of fine particles that seal out oxygen and seal in carbon dioxide. The more mulch you have covering the roots, the more water it takes to reach the roots, especially in drought.
More ornamentals are killed by either over-mulching or using poor-quality mulch than by any other cause.
Mulches vs. Compost
The worst mulches on the market are Big Red and Big Brown. These are made of ground pallets or wood waste dyed with artificial color. They rob nutrients from the soil. Shallow-rooted plants such as azaleas, rhododendrons, boxwoods, herbaceous perennials and annuals are unable to compete.
Double-shredded hardwood bark, the most popular mulch, is the second-worst. When it eventually decomposes, it leaves behind high levels of manganese, which accumulates from repeated applications. Double-shredded hardwood bark mulch also tends to raise the pH of the soil, making it more alkaline, which is opposite of what azaleas and rhododendrons need.
Also avoid using marble chips and bluestone around such acid-loving plants as azaleas, rhododendrons, mountain laurel and andromeda. Marble chips and bluestone are low grades of limestone that will cause an increase in soil pH, making the soil too alkaline.
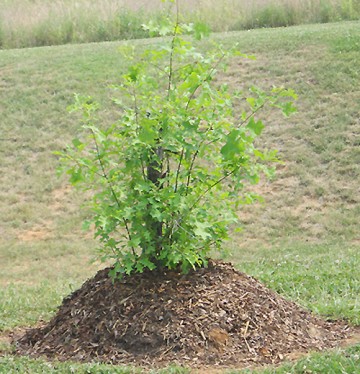
If you must use mulch, choose shredded pine bark mulch. Shredded pine bark mulch contains the most lignins, which decompose slowly and do not leave a residue of manganese. Do not exceed a depth of one inch. Research has repeatedly shown that it only takes an inch of mulch to prevent water loss by evaporation. That is also an adequate amount to be aesthetically pleasing.
A single application of pine bark mulch can last you two to three years. All you need to do is use a steel rake to fluff the existing mulch. If that is not adequate, you should always remove the old mulch before placing new mulch. By doing so, you minimize the chances of suffocating your plants’ roots due to the accumulative effect of repeated mulching.
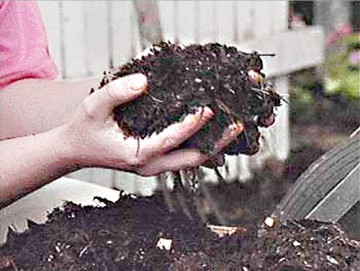
The best solution is applying one inch of compost per year. It will not only look great but also will supply nutrients to the plants at the same time.
GROWING A GARDEN
Preparing Garden Soil
Do not spade your garden. Spading before planting not only costs soil moisture, spading dry soil is downright harmful. Become a modern farmer by planting no-till.
Think about it: Spading primarily buries weeds. Unless you’re incorporating lots of compost into the soil, you gain nothing, other than exercise, from spading your soil. To conserve soil moisture and energy, simply hoe out the weeds or kill them with either horticultural vinegar or Roundup about a week before you intend to plant.
Immediately after planting, mulch the garden with LeafGro or compost.
Not only will your new no-till gardening conserve moisture and energy, it will also help conserve the soil’s organic matter. Every time you spade or rototill the soil, you hasten the decomposition of organic matter, causing your soil to become denser. It is easier for the roots of plants to penetrate soils rich in organic matter than to penetrate soils that are devoid of organic matter.
The roots of your new transplants will follow those worm holes deep into the soil as well as filling the voids left behind by the decayed roots of last year’s plants.
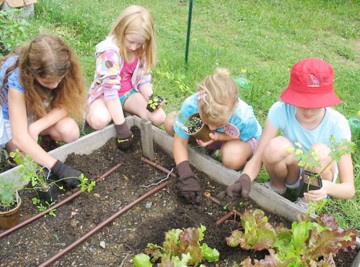
Planting Cool-Loving Veggies
For a bigger harvest this summer, plant young transplants of broccoli, cabbage, cauliflower, Chinese cabbage, collards, kale, kohlrabi and Swiss chard as soon as you can work the soil in April. If you haven’t started to grow your own plants from seed in late winter, you can buy plants at nurseries and seed and feed stores.
Early planters also include onions, planted from sets, and peas, from seed. Sow lettuce and radishes directly into the garden. These salad favorites grow best in cool weather; most are generally immune to late frost damage, especially without mulch. Heat released from the ground during frosty nights provides adequate protection.
Because soils are still cold when these crops are planted, use a starter fertilizer at transplanting time. Your soil may be rich in organic matter, but those nutrients are not readily available; microorganisms need warmer soils to release the nutrients.
The ground is too cool now for common granular fertilizers such as 10-10-10. The nutrients in starter fertilizers, however, are readily absorbed by roots.
Compost-rich gardeners can use a starter fertilizer such as 20-20-20 or 25-10-10 at the rate of two tablespoon per gallon of water, applying half a cup around each root ball.
Bedding Asparagus
Asparagus tops make for a great background for flowering plants, and fresh spears of asparagus on toast with Hollandaise sauce make a great meal.
Asparagus needs well-drained soil and full sun to reach maximum potential.
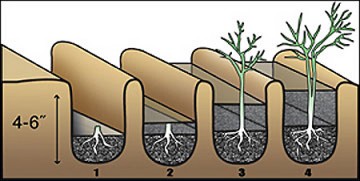
To successfully plant asparagus, in early April dig a trench 10 to 12 inches wide and eight to 10 inches deep. Place one to two inches of compost in the bottom of the trench and spade the compost into the soil to a depth of four inches.
Place the asparagus crowns over the spaded soils at eight-inch intervals, spreading the roots uniformly flat on the soil. Cover with about two inches of soil amended 1-to-1 with compost. As the asparagus spears begin to grow, continue adding amended soil to the trench until it is full.
Do not harvest any asparagus spears for at least two years. Allow the foliage to grow to its maximum height, and do not cut the stems to the ground until late fall when they have completely turned golden-brown. By delaying cutting back the tops, you allow the residual nutrients in the stems and leaves to return to the roots. After you have cut the asparagus back to the ground in the fall, mulch the bed with a two-inch-thick layer of compost. The compost mulch will not only help to insulate the bed but will also supply all of the nutrient needs for next year.
In the third year, you may start harvesting asparagus spears in the spring. During the first year of harvesting, you should limit your harvests to two. For maximum recovery, cut the asparagus spears just below the surface of the soil using a sharp knife.
Growing from Seed
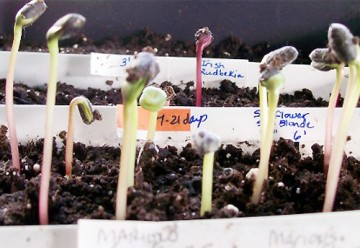
With an abundant supply of Pro-Mix or Metro-Mix (available at garden centers), it is easier than ever to start and grow your own transplants. For starting seeds, I prefer these mixes blended with equal parts by volume of very fine vermiculite or perlite. Avoid breathing the dust of these products.
A three-inch plastic pot makes an ideal seed-sowing container. To avoid disturbing the seeds after they have been sown, moisten the potting mix well before filling the pot. Fill to within one-half inch of the top edge and scatter the seeds uniformly over the top. Generally one packet of seeds fills one pot. Cover the seeds with a light sprinkling of play sand and irrigate with a light spray.
Place the pots in a large plastic bag and place the bag on a shelf or table near a window but not on the window ledge. Avoid windows facing south and west.
Within a few hours, you should see moisture condensing on the inside of the bag. Allow the bag to remain closed until your seedlings emerge. Check the pots daily to make certain that they are damp, and remove each one as the majority of seeds have germinated. Since not all species of plants have the same germinating period, germination may require from five days to three weeks.
Place the pots that have germinated on a tray and near a window facing south or west, and check daily to make certain they do not dry out.
Placing them under a table lamp will hasten growth and produce stronger plants. Fertilizing them with a one-half concentration of liquid fertilizer by the second week after they have been removed from the propegation bag will ensure greater vigor.
When the seedlings are one-quarter-inch to one-half-inch tall, lift them carefully from the mix and transplant them into individual pots.
Planting Warm-Weather Crops
Warm season crops — annual flowers, tomato, pepper, eggplant, okra, corn, beans, squash, cucumbers and melons — can be started from seed indoors in earliest spring. Or they can be purchased as seedlings.
Only when soil temperature in the upper four inches is 60 degrees or higher — late May or early June — is it safe to plant them in the garden. A sloping garden facing south should delay planting until soil temperatures are 65 to 70 degrees. Such south-facing soils warm more rapidly but are equally susceptible to frost.
Delaying plantings until soils warm also assures that natural nutrients from organic sources will be available.
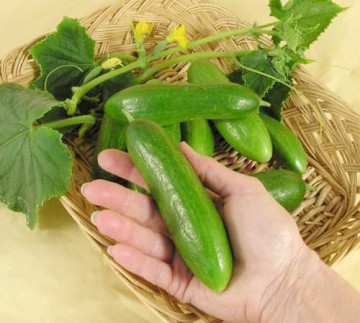
Planting Cucumbers, Squash and Melon
In a small garden, it is best to grow vine crops such as cucumbers, squash and melons on hills or mounds spaced approximately eight feet apart. No earlier than late May, spade into the ground where each hill is to be planted at least one-half bag of compost. In the middle of each hill, place a plastic five-gallon pail with three or four one-quarter-inch holes drilled into its bottom.
Fill each bucket two-thirds full with Chesapeake Blue or Chesapeake Green compost. Sow the seeds of cucumbers, squash or melons around the outside of each pail and cover lightly with sand. Sprinkle the soil lightly every day until the seeds germinate. Thin the seedlings around each pail to no more than four plants per hill. As soon as the plants start to produce vines, begin irrigating the hills weekly by filling each pail with water. The water will filter through the compost, carrying with it nutrients into the soil. As soon as the vines begin to set fruit, increase your watering to twice weekly.
If the plants begin to yellow in mid-summer, there is not sufficient nitrogen in the soil. This problem can be solved in one of two ways. One, place two to three tablespoons of urea nitrogen into each pail. Two, replace the old compost with new.
This is an efficient method of irrigating plants because the water seeps slowly into the ground instead of flowing away from each hill.
If you need to conserve more space, you can grow cucumbers, melons and vine squash on trellises.
Prepare a Calcium-Rich, Sunny Soil for Tomatoes and Peppers
Harvesting attractive and delicious tomatoes starts in winter when you feed the soil calcium by spreading wood ash in your garden. Dig the ash deeply into the area where tomatoes are to be grown.
If you have not been adding wood ash to your garden regularly, you can still grow luscious tomatoes and peppers this year.
After the last chance of frost in mid- to late-May, choose a spot that gets full sun and dig a hole some three feet in diameter and 18 inches deep. Mix the soil thoroughly with one-third by volume of compost, one cup of dolomitic limestone and one cup of gypsum. Dig the mixture back into the hole and plant your tomato or pepper plants in the middle.
After the tomato and pepper plants start growing, spread about two heaping tablespoons of 10-10-10 fertilizer or six heaping tablespoons of bone meal in a 12-inch circle around the base of each plant and cultivate into the soil.
Give Plants Room to Grow
Plants such as tomatoes, peppers and eggplants need not only an adequate amount of light for each plants’ photosynthesis but also adequate air circulation around the leaves, stems and fruit to minimize disease. When plants are crowded, they compete for light, water and nutrients. Crowding also prevents air from freely circulating through the foliage. Thus foliage and fruit stay wet longer, making conditions more favorable to disease. Crowded plants need more fungicides to control diseases.
A tomato plant that has been allowed nine square feet of space will produce many more tomatoes than plants given only four square feet of growing space.
Planting Tomatoes
Rumor has it that burying the stem of a tomato plant forces it to produce more roots, thus producing higher yields. If you’ve been advised to plant your tomatoes deep or to lay them sideways in a shallow trough, ignore that advice.
Research has demonstrated that tomato plants and all other annuals should be planted at the same depth of their existing root balls. When you plant too deep, you suffocate the original root system so that the plant must develop new roots along its stem to survive. Planting the stems in a shallow trough exposes half the roots to excessive drying.
If you purchased tomato plants in peat pots, tear away the top edge of each pot before planting. If the peat pot protrudes above ground, the exposed edge will wick water out of the soil and from around the root ball.
If the roots of the tomato plants are not growing out through the walls of the peat pot, tear away the entire pot before planting. If peat pots dry out before the roots penetrate the walls, the walls so harden that they become impervious to water and roots.
If you purchased tomato plants growing in cell packs or in pots, tear away some of the outer roots on each root ball before planting them in your garden.
Encourage Firm, Sweet Peppers
Don’t let your peppers bloom too soon. Allowing the first set of flowers to set fruit will most likely stunt the plant early in its development, resulting in thin-walled peppers for the rest of the season.
Inspect your pepper plants at least twice a week to remove those early flowers with your fingernails.
Peppers turn from green to red or yellow only when they approach maturity. Hasten coloration by harvesting the peppers as soon as 25 percent of the fruit has colored. Store them in a paper bag with a red delicious apple or a very ripe, almost black banana at room temperature for a couple of days. Both red delicious apples and over-ripe bananas generate ethylene gas, which will hasten the ripening of peppers. Ripe peppers have a very different taste than green peppers. Much of the difference is due to sweetness.
If you want your pepper plants to produce abundantly, harvest as soon as peppers approach full size. Allowing the peppers to remain on the plants until you are ready to use them results in smaller peppers in succeeding harvests. Since peppers store well, they will keep fresh in the fridge. Peppers also freeze well. They do not have to be blanched. Simply cut them up in bite-sized pieces and pack them into freezer bags.
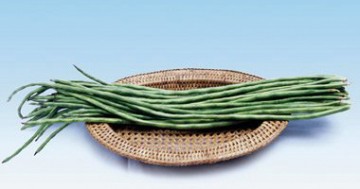
For Small Gardens, Try Gita Pole Beans
You like to eat fresh string beans but only have limited space. And you certainly don’t like the back-breaking task of harvesting regular bush beans.
The solution is yard-long beans like the Gita variety. Gita is essentially a pole grower with beans the diameter of a pencil that grow between 24 and 36 inches long. Gita is easy to harvest, and a single planting will produce beans all summer long — providing you keep them well watered and frequently harvested. The beans are tender with a flavor that is equal to or better than that of any bush bean on the market.
For maximum yield and tender beans, plant them in full sun near a trellis seven to eight feet high. An eight-foot-long row will supply a family of four with all the beans they can eat and store — if you harvest them at least twice weekly.
Gita are not affected by insects or diseases, an important feature for organic gardeners.
Gita is also good for home-freezing, as the bean is easily blanched in the microwave and freezes well. There is no loss of flavor from freezer storage for at least eight months.
Water Your Garden the Right Way
Daily watering is bad for every garden. Keeping the soil constantly wet limits root growth. Light, daily irrigations cause roots to grow shallow, making them more susceptible to drought damage due to limited root distribution.
Alternate wetting and drying of the soil is what stimulates roots to grow. A single heavy application of water weekly is all that is needed to successfully grow a garden.
If your garden does not receive an inch of rain each week, irrigate. To get the equivalent of one-acre-inch of water, water with a lawn sprinkler and until a tuna fish can is full.
The worst method for irrigating a garden is with a garden hose and hand-held nozzle — unless you are planning on drinking a few beers while sitting in a very relaxing chair.
Never spray heavy drops of water directly on the soil. The impact destroys soil structure. A breaker commonly known as a showerhead is the ideal tool for watering the garden by hand. It allows for a volume of water to be applied as mild raindrops. Minimize the damage of large water droplets (and reduce the loss of water by evaporation) by laying a half-inch of compost or light mulch over the soil.
Proper watering also helps avoid such leaf diseases as powdery mildew, frog eye and black spot on roses.
Most leaf diseases are caused by the foliage remaining wet for 14 hours or more. To avoid the spread of disease on the leaves of plants, don’t water in the early morning. Wait until an hour after foliage has dried from the dew. To make certain that the foliage is completely dry by evening, never water after 4pm.
Best of all, wait until the sun goes down. Night is the best time to water. The loss of water by evaporation is minimized, so more water goes into the soil. Since foliage will already become wet with dew, water applied at night will dry at the same rate that the dew dries in the morning.